Setting up a new business in 30 mins in the cloud


Is it really possible? I bet yes – in this cloud world this is very much conceivable to start your new business with a new domain name, email, productivity suite and a storage for your confidential business data within that time.

Prerequisite

You need a computer having capability to run a browser at least and an Internet connection.

Steps

Step 1: Sit relax and have a cup of coffee
Step 2: Go to any domain registrar site. For example: godaddy.com
Step 3: Register the domain name you have already decided
Step 4: Buy an office 365 license (https://products.office.com). I would prefer to buy E3 license as it includes email, Lync, one drive, SharePoint and office desktop productivity suite
Step 5: Configure your domain for email from office 365 admin center. You just need to follow the office 365 domain configuration wizard and add some DNS records in you domain’s control panel (MX, SRV, SIP records etc). For me it took 5 to 6 minutes only
Step 6: Create a mailbox for your business communication. Office 365 wizard will verify all the settings of your domain and will confirm whether email settings are correct or not.

That’s it!!
Start using Outlook to send email to your customer.
Use office online or download office desktop suite from the office 365 portal.
Start using OneDrive to store your business data.
Start using SharePoint to create your business website.
Start accessing your email, business data from desktop, mobile or laptop.

Things are so easy these days.

How to import on-premises ORACLE data to ORACLE RDS, few simple steps!!

Importing data to ORACLE RDS will be a complex job if you are doing it for the first time. You can follow the below simple steps to do that.

  • Create an ORACLE RDS DB instance from AWS management console
  • Go to your source database and create a DBlink as below
    create database link UR_DB_LINK_NAME connect to UR_RDS_USER_ID identified by UR_RDS_PASSWORD
    using ‘(DESCRIPTION=(ADDRESS=(PROTOCOL=TCP)(HOST=UR_IP_RDS_IP_OR_DNS)(PORT=1521))(CONNECT_DATA=(SID=UR_RDS_SID)))’;
  • Connect to your local ORACLE DB using Oracle SQL Developer
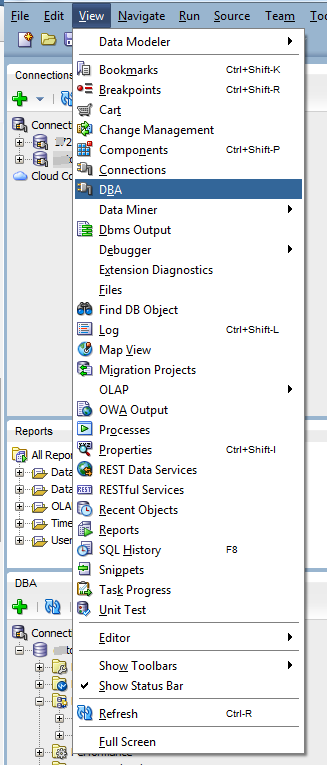
  • Click on View menu –> DBA to view the DBA portion to use data pump
  • Connect with your source DB with a DBA user
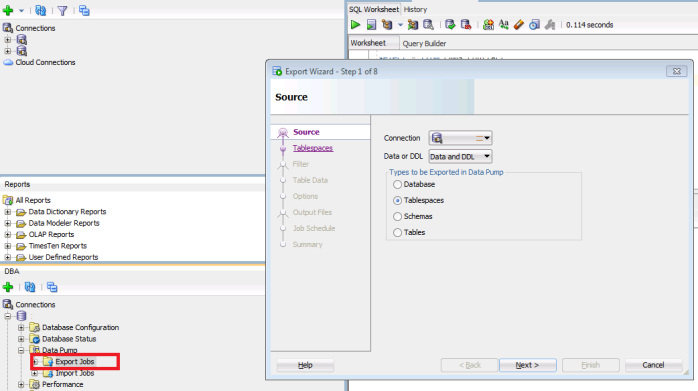
  • Expand the data connection –> right click on Export Job and Click on Data pump export wizard
  • Select the Tablespaces you want to export and export that to a .dmp file
  • Transfer the .dmp file to your RDS by using the below script. Run this script from your source DB’s SQL window

BEGIN
DBMS_FILE_TRANSFER.PUT_FILE(
source_directory_object => ‘UR_SOURCE_DIRECTORY‘,
source_file_name => ‘UR_EXPORT_FILE_NAME.dmp’,
destination_directory_object => ‘DATA_PUMP_DIR’,
destination_file_name => ‘UR_IMPORT_FILE_NAME.dmp’,
destination_database => ‘UR_DB_LINK_NAME
);
END;
/

  • It will take some time to export this to RDS – based on your file size and network speed
  • After successful transfer, connect with the RDS from Oracle SQL developer
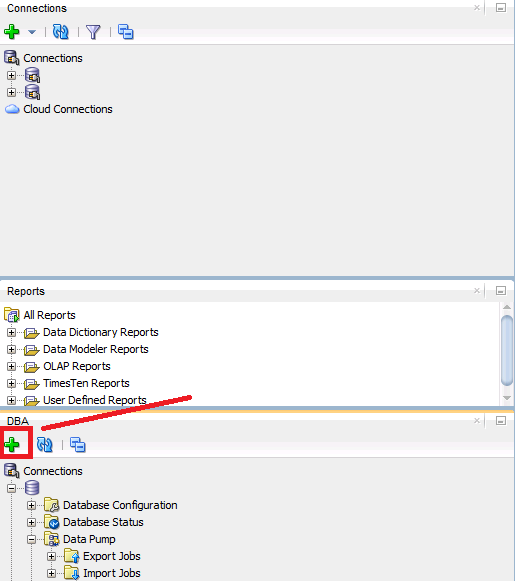
  • Add the DBA connection with RDS to initiate data pump wizard
  • A tricky part – create tablespace in your RDS with the same name as it was before. It will help you to automatically export those schema, otherwise you will need some manual work map exported tables to you existing RDS tablespace. Use the below script to create those tablespaces:

create tablespace YOUR_SOURCE_TABLESPACE_NAME_DATA
create tablespace YOUR_SOURCE_TABLESPACE_NAME_INDEX

  • Use the Data pump import wizard and select the file which you have imported earlier
  • Your RDS is ready for service!!

AWS Multi-factor authentication with Google Authenticator

Running infrastructure in the cloud means, you are allowing everybody to sniff your core as long as you are not implementing enough security measure. Now a days it is very easy to look into/modify your hosted service from any corner of the world – like someone from my small village in Bangladesh may sniff your cloud datacentre hosted in Sydney with his Chinese smartphone having a 2G network. What if your root account details has been compromised, it will be a disaster for you.

To tighten the security in AWS cloud there are few security measures you can follow:

  • Do not store your access key in AMI, instead use IAM role for allowing a machine to use a particular service
  • Periodically renew your access key
  • Enable multi-factor authentication for all users

Enabling multi-factor authentication for root user

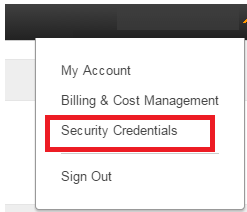
  • After login to your AWS console, click on your user name and click security credential
  • Click Multi-Factor Authentication
  • Assuming that you have a smart mobile. I am using my android device to do that
  • Install Google Authenticator on your Android device
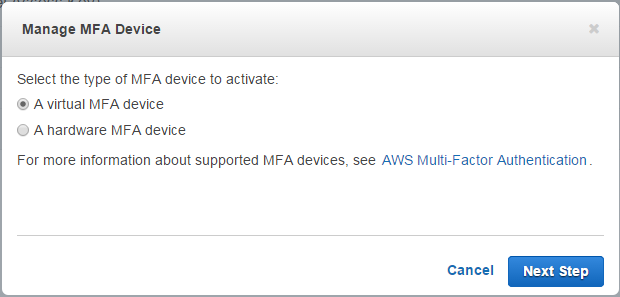
  • From your AWS console select A virtual MFA device
  • Click on Next step twice
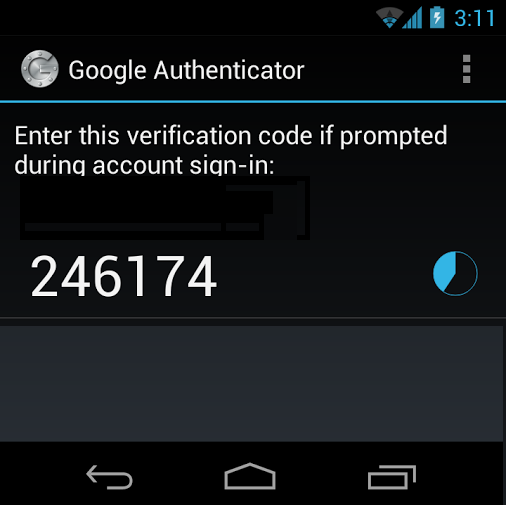
  • Open the Google authenticator on your mobile
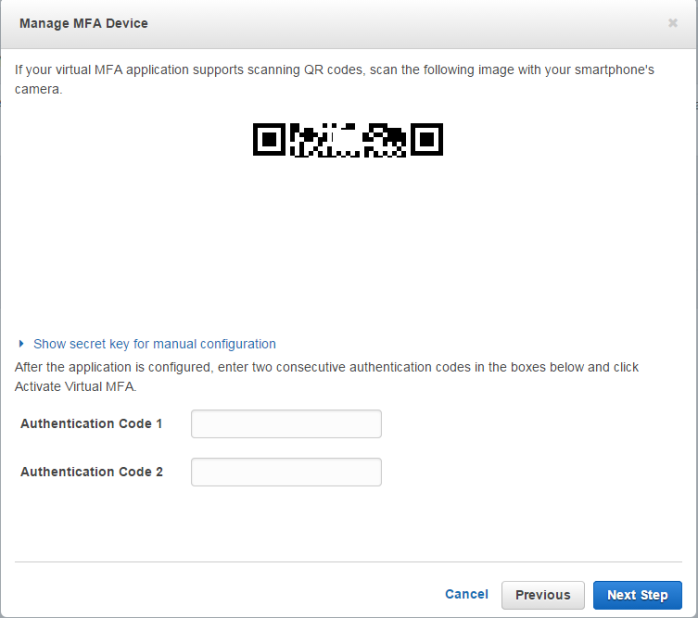
  • Scan QR Code with Google authenticator which is showing in your AWS console
  • After scanning the QR codes your mobile device will show you two authentication codes
  • Enter both code in Manage MFA device wizard
  • Click next step and click finish
  • Logoff from AWS console
  • Try to login again. The system will ask you for MFA token. Open google authenticator from your mobile device and enter that code and login