Setting up a new business in 30 mins in the cloud


Is it really possible? I bet yes – in this cloud world this is very much conceivable to start your new business with a new domain name, email, productivity suite and a storage for your confidential business data within that time.

Prerequisite

You need a computer having capability to run a browser at least and an Internet connection.

Steps

Step 1: Sit relax and have a cup of coffee
Step 2: Go to any domain registrar site. For example: godaddy.com
Step 3: Register the domain name you have already decided
Step 4: Buy an office 365 license (https://products.office.com). I would prefer to buy E3 license as it includes email, Lync, one drive, SharePoint and office desktop productivity suite
Step 5: Configure your domain for email from office 365 admin center. You just need to follow the office 365 domain configuration wizard and add some DNS records in you domain’s control panel (MX, SRV, SIP records etc). For me it took 5 to 6 minutes only
Step 6: Create a mailbox for your business communication. Office 365 wizard will verify all the settings of your domain and will confirm whether email settings are correct or not.

That’s it!!
Start using Outlook to send email to your customer.
Use office online or download office desktop suite from the office 365 portal.
Start using OneDrive to store your business data.
Start using SharePoint to create your business website.
Start accessing your email, business data from desktop, mobile or laptop.

Things are so easy these days.

How to import on-premises ORACLE data to ORACLE RDS, few simple steps!!

Importing data to ORACLE RDS will be a complex job if you are doing it for the first time. You can follow the below simple steps to do that.

  • Create an ORACLE RDS DB instance from AWS management console
  • Go to your source database and create a DBlink as below
    create database link UR_DB_LINK_NAME connect to UR_RDS_USER_ID identified by UR_RDS_PASSWORD
    using ‘(DESCRIPTION=(ADDRESS=(PROTOCOL=TCP)(HOST=UR_IP_RDS_IP_OR_DNS)(PORT=1521))(CONNECT_DATA=(SID=UR_RDS_SID)))’;
  • Connect to your local ORACLE DB using Oracle SQL Developer
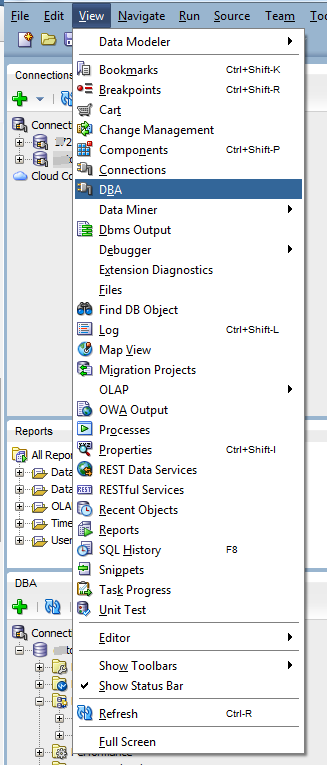
  • Click on View menu –> DBA to view the DBA portion to use data pump
  • Connect with your source DB with a DBA user
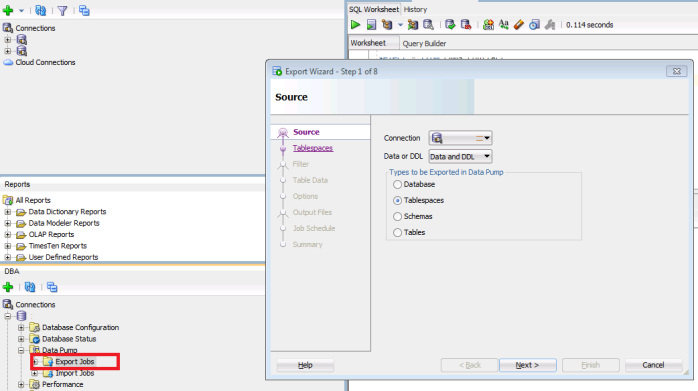
  • Expand the data connection –> right click on Export Job and Click on Data pump export wizard
  • Select the Tablespaces you want to export and export that to a .dmp file
  • Transfer the .dmp file to your RDS by using the below script. Run this script from your source DB’s SQL window

BEGIN
DBMS_FILE_TRANSFER.PUT_FILE(
source_directory_object => ‘UR_SOURCE_DIRECTORY‘,
source_file_name => ‘UR_EXPORT_FILE_NAME.dmp’,
destination_directory_object => ‘DATA_PUMP_DIR’,
destination_file_name => ‘UR_IMPORT_FILE_NAME.dmp’,
destination_database => ‘UR_DB_LINK_NAME
);
END;
/

  • It will take some time to export this to RDS – based on your file size and network speed
  • After successful transfer, connect with the RDS from Oracle SQL developer
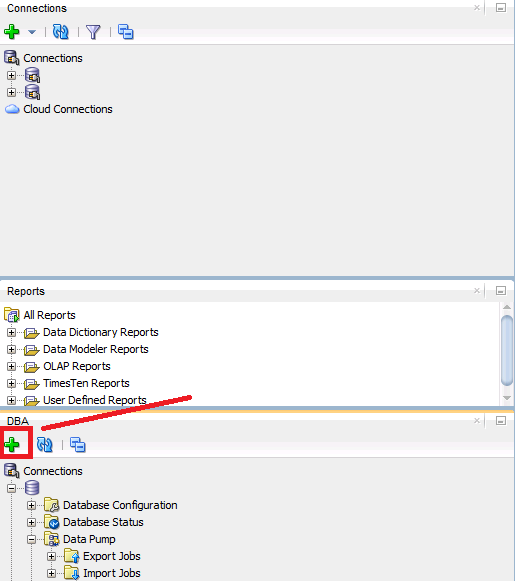
  • Add the DBA connection with RDS to initiate data pump wizard
  • A tricky part – create tablespace in your RDS with the same name as it was before. It will help you to automatically export those schema, otherwise you will need some manual work map exported tables to you existing RDS tablespace. Use the below script to create those tablespaces:

create tablespace YOUR_SOURCE_TABLESPACE_NAME_DATA
create tablespace YOUR_SOURCE_TABLESPACE_NAME_INDEX

  • Use the Data pump import wizard and select the file which you have imported earlier
  • Your RDS is ready for service!!

AWS Multi-factor authentication with Google Authenticator

Running infrastructure in the cloud means, you are allowing everybody to sniff your core as long as you are not implementing enough security measure. Now a days it is very easy to look into/modify your hosted service from any corner of the world – like someone from my small village in Bangladesh may sniff your cloud datacentre hosted in Sydney with his Chinese smartphone having a 2G network. What if your root account details has been compromised, it will be a disaster for you.

To tighten the security in AWS cloud there are few security measures you can follow:

  • Do not store your access key in AMI, instead use IAM role for allowing a machine to use a particular service
  • Periodically renew your access key
  • Enable multi-factor authentication for all users

Enabling multi-factor authentication for root user

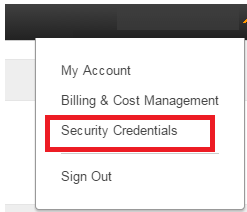
  • After login to your AWS console, click on your user name and click security credential
  • Click Multi-Factor Authentication
  • Assuming that you have a smart mobile. I am using my android device to do that
  • Install Google Authenticator on your Android device
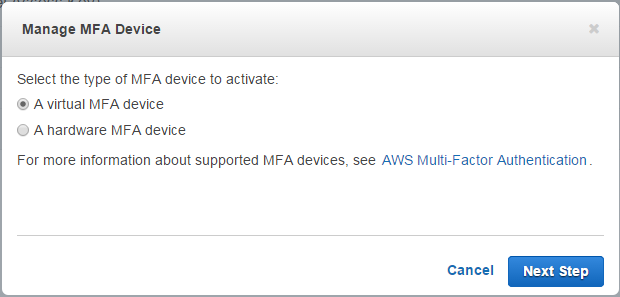
  • From your AWS console select A virtual MFA device
  • Click on Next step twice
  • Open the Google authenticator on your mobile
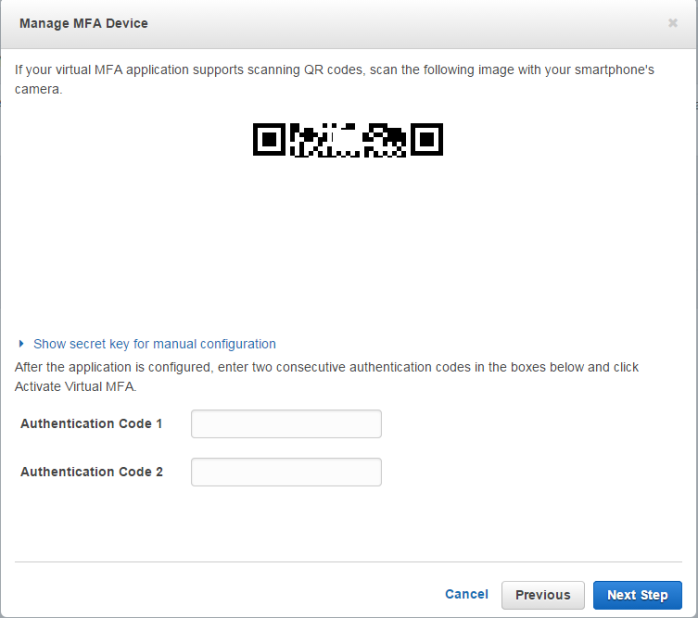
  • Scan QR Code with Google authenticator which is showing in your AWS console
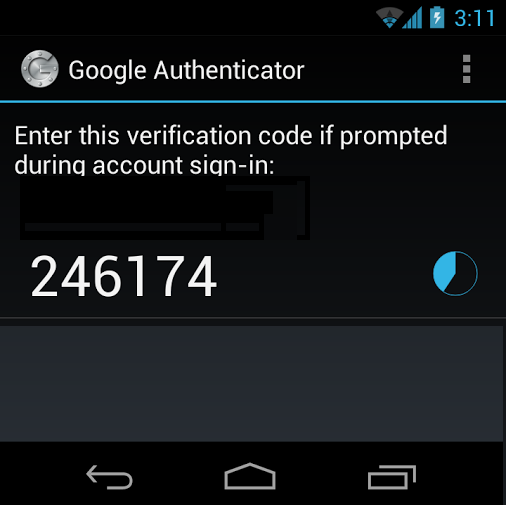
  • After scanning the QR codes your mobile device will show you two authentication codes
  • Enter both code in Manage MFA device wizard
  • Click next step and click finish
  • Logoff from AWS console
  • Try to login again. The system will ask you for MFA token. Open google authenticator from your mobile device and enter that code and login

A simple backup solution with AWS S3

Data availability is one of the biggest concern in IT industry. After moving most of my services to the AWS cloud I was thinking how I can ensure data availability and accuracy in case of AWS data center failure or what if my EC2 EBS volume gets corrupted.

A case study

I have a MSSQL server running on EC2 instance.

  • I need to ensure I can restore data from backup in case of user demand, in case of data center failure or in case of instance failure
  • On the other hand I need to ensure it will not increase my AWS monthly charges unexpectedly
  • I will only run that service during the business hours

Solution could be

  • Use AWS MSSQL RDS. The service will take care of everything including backup and patch update. This is really a very reliable service AWS is providing. But to fulfil my last requirement it will be a lot of work for me, since RDS can’t be stopped, you can only terminate RDS (yes, you can take snapshot before terminating)
  • Use EC2 instance and take snapshot backup of your EC2 EBS volume. But my EBS volume is 120 GB, much bigger than the original SQL DB backup. Which means it will cost me more to store multiple snapshots in S3 (120 GB x 7days).

The solution I am using

  • Created a maintenance plan in SQL Server to take daily db backup
  • Created an AWS CLI script to sync data from SQL server backup location to a S3 bucket
  • aws s3 sync \\SERVER_NAME\backup$ s3://BUCKETNAME –exclude * –include *.bak
  • Created a batch job to move local SQL server backup data to another folder for old data clean-up
  • move \\SERVER_NAME\backup$\*.* \\SERVER_NAME\backup$\movedS3
  • Create a maintenance plan in SQL Server to delete older files from movedS3 folder. It will help me to control unwanted data growth
  • Created a lifecycle policy to delete older files from my S3 bucket

What this solution will ensure

  • First of all I can sleep tight during night. I don’t need to worry about my backup data. 😉
  • S3 provides me 99.999999999% data durability. It means I will be able to access my S3 data in case of AWS availability zone failure also. Because S3 data synchronizes between multiple availability zone.
  • S3 is the cheapest cloud data storage solution. That’s why drop box dare to give you such storage space as free 😉

What else you need??

One simple approach to minimize operating cost in AWS

I am using AWS for the last couple of months. The more I am exploring it, the more I am loving it. Thinking about doing a PhD on AWS (Just kidding).
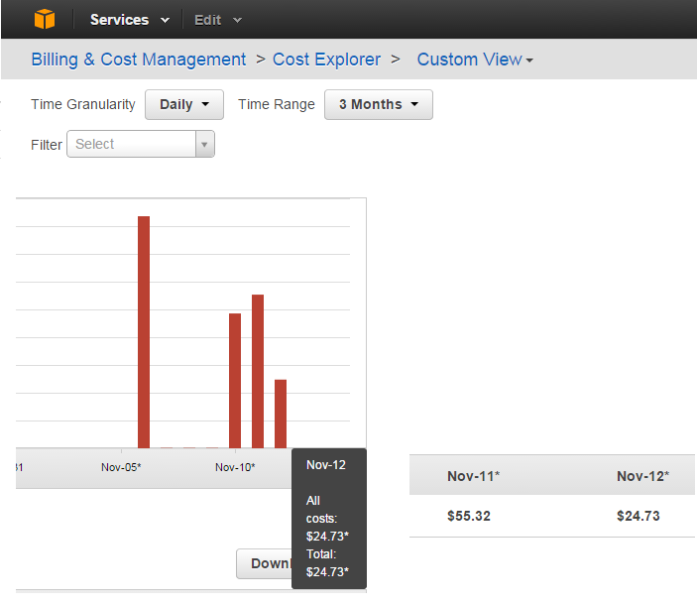
Since I am still using my credit card, sometimes it’s scary while running a large instance as pay per use model. What I have observed is most of my internal servers are only running during the office hour but they are generating cost as those are running instances. Below approach helps me to minimize 50% cost that was generating earlier.

Use AWS CLI

Using AWS CLI you can create a simple script which will run as a scheduler to stop and start any instance.

In start batch file write the below command
aws ec2 start-instances –instance-ids [YOUR INSTANCE ID]
You will find the instance id in EC2 management console. Add multiple instance id in the same line with a space.

In stop batch file write the below command
aws ec2 stop-instances –instance-ids [YOUR INSTANCE ID]
You will find the instance id in EC2 management console. Add multiple instance id in the same line with a space.

  • Create two windows scheduler and map those batch files to run as you want

I have seen a tremendous result in my environment after following this technique. I am still very new in AWS world and I am sure there may be several other techniques available to control the cost on AWS. Please do let me know if you are following any better approach.

Concern

  • Do not store anything in the temporary drive AWS creates. AWS always refresh temporary drives data after restarting
  • Use VPC to have same private IP
  • If you have public IP associated with an instance, use elastic IP as AWS will assign new public IP if you stop and restart an instance, in case you are not using any elastic IP


Step by step – site-to-site VPN with AWS VPC and CISCO ASA 5505

To configure VPC follow the below steps:

  • Login to AWS console
  • From services select VPC
  • From VPC Dashboard click on Start VPC Wizard
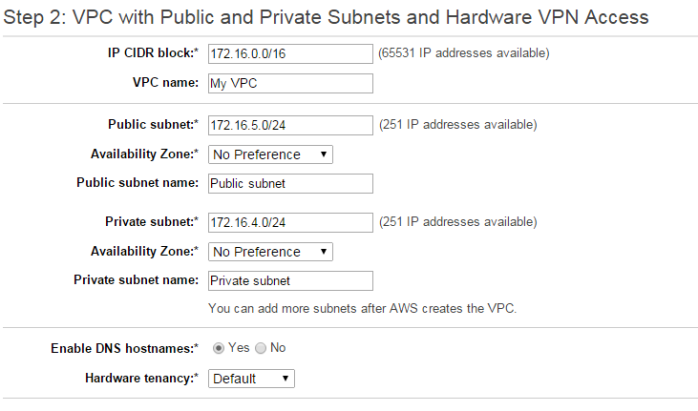
  • Click on VPC with Public and Private subnets – (assuming that you network will have internet access as well) and click on Select button
  • Enter configuration details as below (assuming your network will be 172.16.4.0/24)
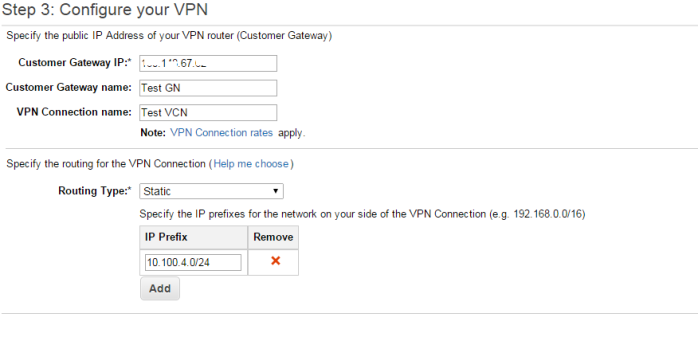
  • Click Next
  • Enter IP firewall outside IP, enter name for gateway and VPN
  • Select routing type as static
  • Enter your office network IP prefix
  • Assuming that you AWS Private subnet will be: 172.16.4.0/24
  • Click on Create VPC
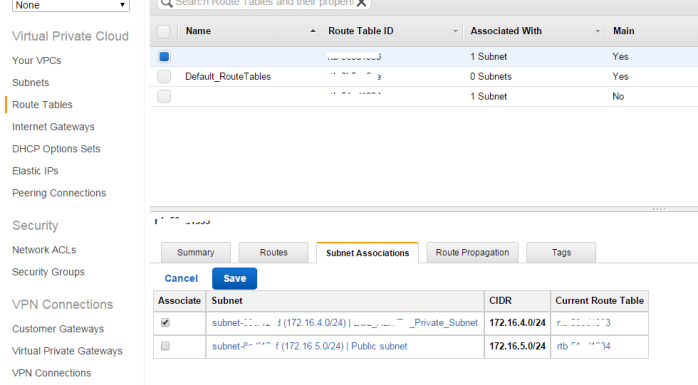
  • After you see the successful creation of you VPC, go to route tables
  • Select the correct route table from the list (associated with 2 subnet)
  • Click on subnet Associations tab
  • Click on Edit
  • Select your subnet and click save button
  • Go to VPN connection link, select your VPN and click on download configuration
  • Open you CISCO ASA firewall
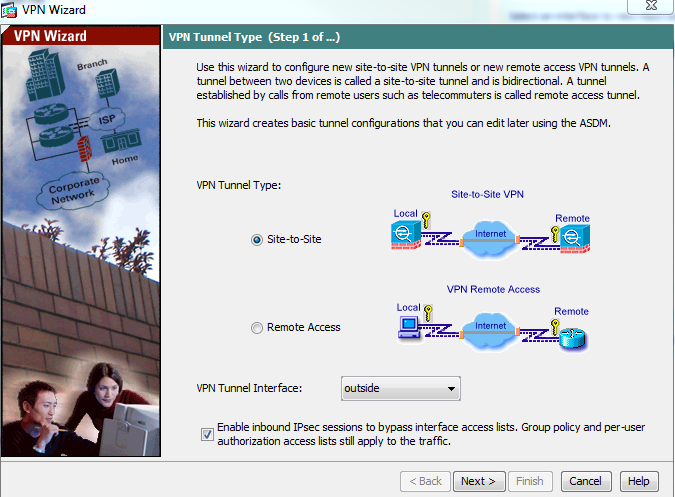
  • Click on Wizard –> IPSec VPN wizard
  • Select site-to-site VPN, VPN tunnel interface as outside and click next
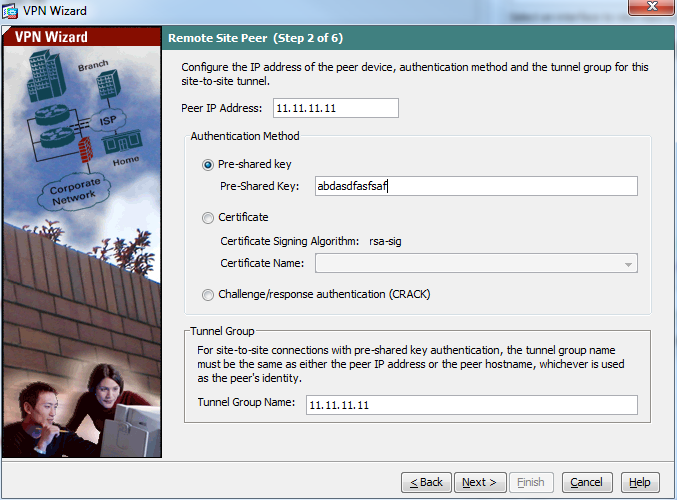
  • Enter the IP address that you have in the downloaded file – as tunnel-group
  • Enter the pre-shared-key that they have provided
  • Click next
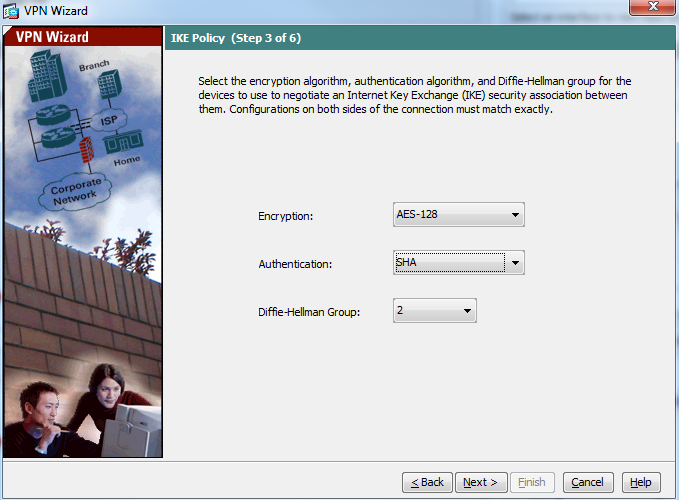
  • Select the configuration as below
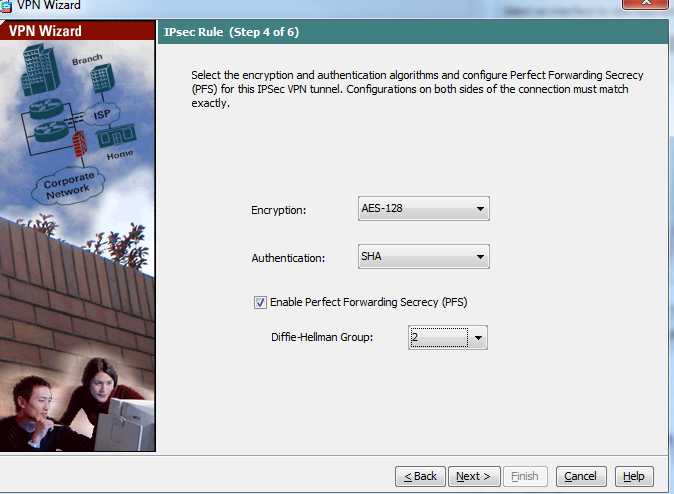
  • Select the configuration as below
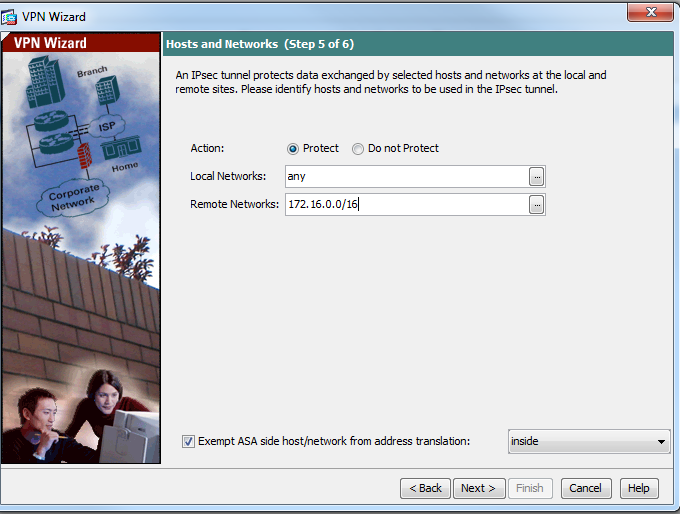
  • Enter the remote network configuration as below
  • Click next and click finish
  • Follow the same step to configure second tunnel-group that you have on that VPN text file
  • Promote a EC2 instance with your newly create VPC
  • Note the private IP address that is automatically assigned to your new instance
  • Open CLI of you CISCO ASA device, we need to configure SLA monitoring as AWS bring the VPN connection down if it does not see the network traffic on the tunnel. To keep the VPN connection alive all the time we need to configure SLA monitoring in our CISCO device
  • Enter the below command
  • ciscoasa# config t
    ciscoasa(config)# sla monitor 1
    ciscoasa(config-sla-monitor)# type echo protocol ipIcmpEcho 172.16.8.4 interface outside
    ciscoasa(config-sla-monitor-echo)# frequency 5
    ciscoasa(config-sla-monitor-echo)# exit
    ciscoasa(config)# sla monitor schedule 1 life forever start-time now
    ciscoasa(config)# icmp permit any outside
  • Now you need to configure your VPC to accept ICMP connection from internet or your firewall outside IP. To configure this
  • Go to VPC –> Security group
  • Select the security group that is associated with the instance you have created earlier
  • Click on Inbound rules tab
  • Click on Edit
  • Select ALL ICMP and enter you firewall outside interface IP as source
  • Click Save
  • Click on VPN connections link
  • Select your VPN and click on tunnel tab
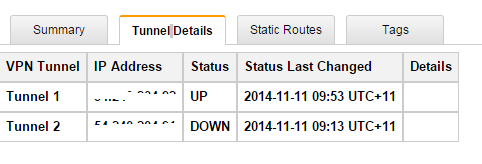
  • You should see at least one VPN tunnel status is UP (In AWS you can’t make two tunnel up at the same time)

Unable to connect to AWS -RDS from SQL Server Management Studio

After promoting RDS instance this is a common problem that you are not being able to access your DB instance. To resolve this issue follow the below steps.

  1. Go to your AWS console – https://console.aws.amazon.com
  2. From Services click on RDC
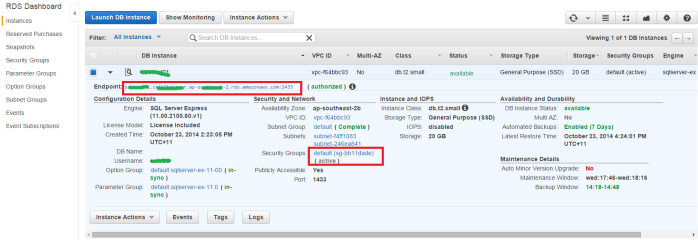
  3. Select the instance that you have created and note the security groups name
  4. From services click on VPC
  5. Go to Security Groups
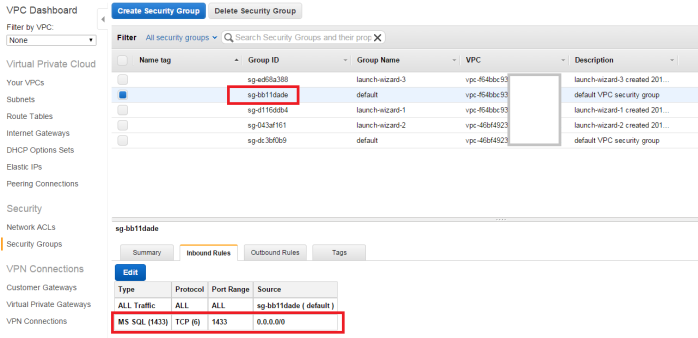
  6. Select the security group that you have noted earlier
  7. Click on Inbound rules
  8. Click on Edit button
  9. Add MSSQL port and source network address (from where you want to connect)
  10. Click save
  11. Now try to connect from your computer, it should work

How to use Openfiler (storage management appliance) with VMware ESXI 5.5

Openfiler is a network storage operating system which has the excellent integration capabilities for virtualization environment. To configure Openfiler in you VMware environment you can follow the below steps:

  • Create a new VM in your esxi host
  • In the configuration window select typical
  • Enter the name of this new VM and click next
  • Select the storage destination of your VM and click next
  • From Guest operating system list select Linux, Version – Other Linux 64-bit and click next
  • Accept the default network configuration and click next
  • For test purpose select the disk size to 20 GB and click next
  • Check Edit virtual machine settings before configuration and click Continue
  • Assign memory to 1GB
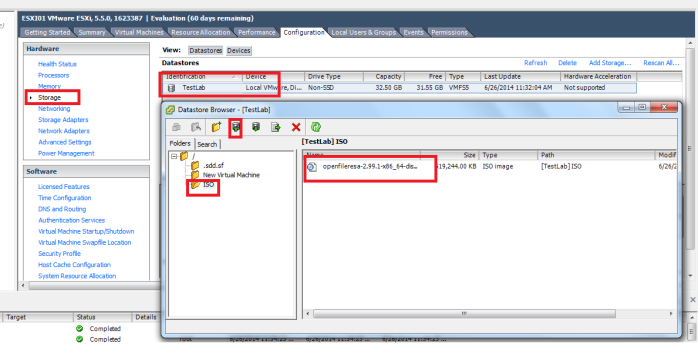
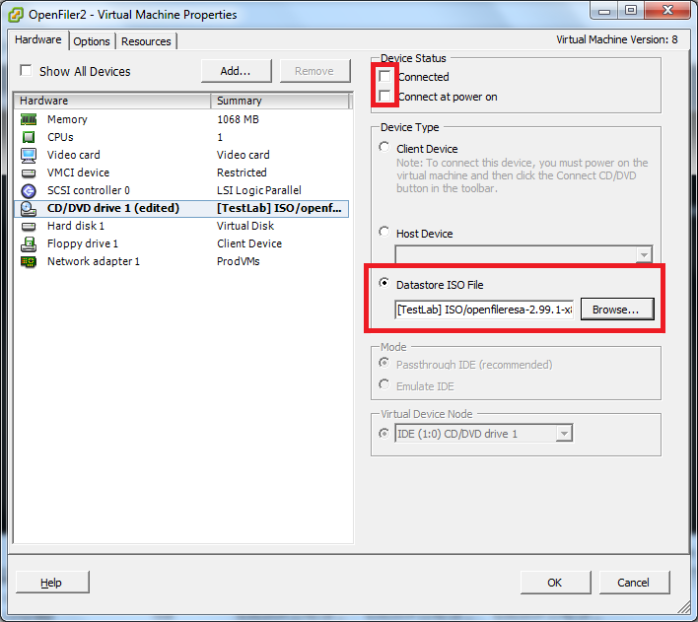
  • Click on CD/DVD drive, select Datastore ISO file and click on Browse, select the ISO
  • From the device status check Connect at power on
  • Click Ok
  • Now you can see a new VM has been created in your ESXI
  • Select the VM and from the getting started page click on Power on the Virtual Machine
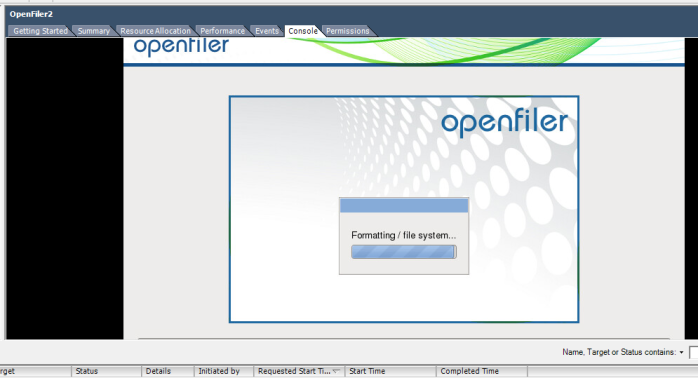
  • Click on Console tab of you VM to complete the installation
  • On the Openfiler installation wizard, click next
  • Select the Language settings and click next
  • Click Yes on the warning dialog box
  • In the drive selection page accept the default settings and click next
  • Click yes on the warning page
  • Assign an IP or use DHCP for the time being
  • Select the time zone and click next
  • Assign a password and click next
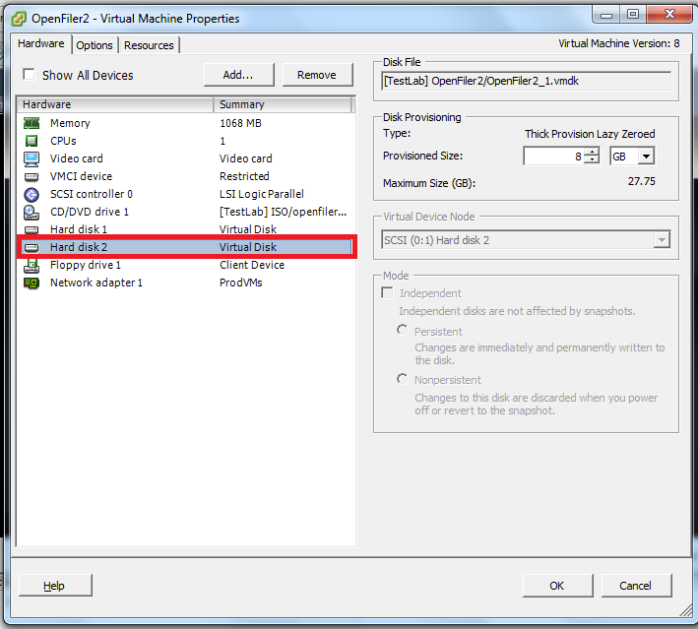
  • Reboot the system, right click on Openfiler VM and click edit settings
  • Add a new Hard disk, this disk will be used as your storage
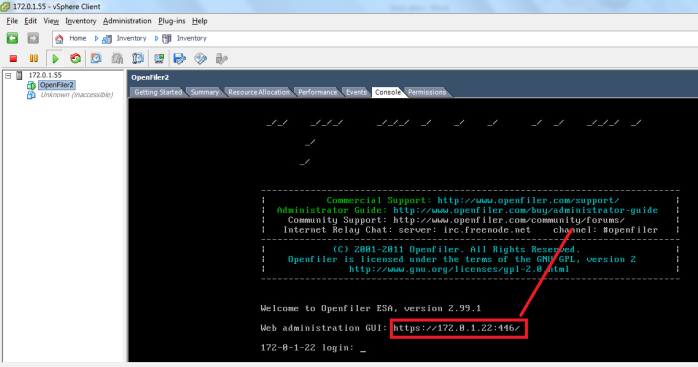
  • After rebooting the system will provide you a web URL
  • Open a web browser and enter that URL
  • The default user name and password is openfiler/password
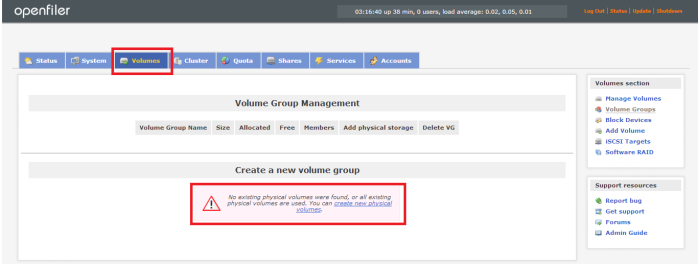
  • Click on the Volumes tab and click on create new physical volume
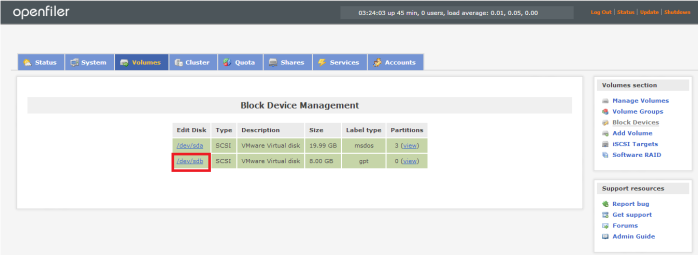
  • Click the URL under edit disk column (the new disk that you have create as VM hard disk)
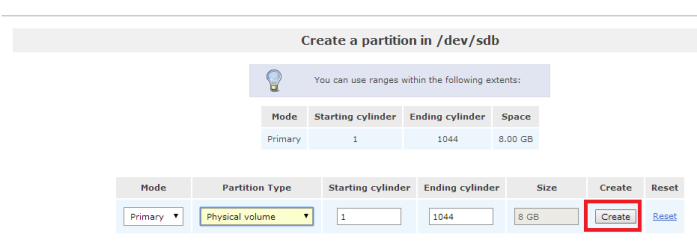
  • Select Mode as Primary, Partition Type as Physical Volume. Click on create button
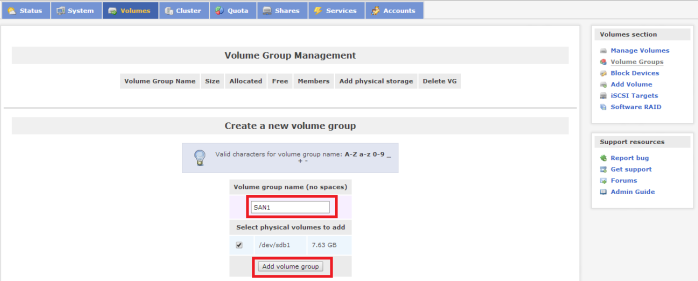
  • Click on Volume Groups link from the right side of the page
  • Give a name of your volume group and select the physical volume and click on Add volume group button
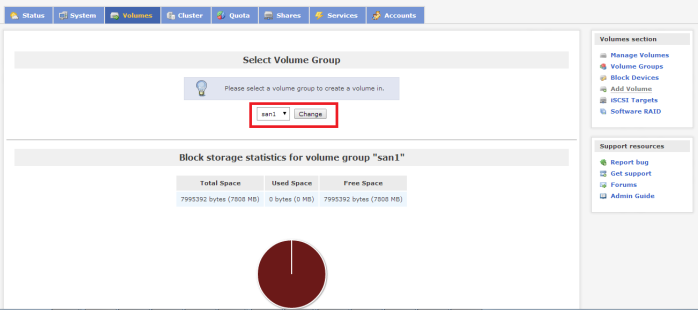
  • Click Add volume link
  • From the Drop down select the volume group you have created and click on Change button
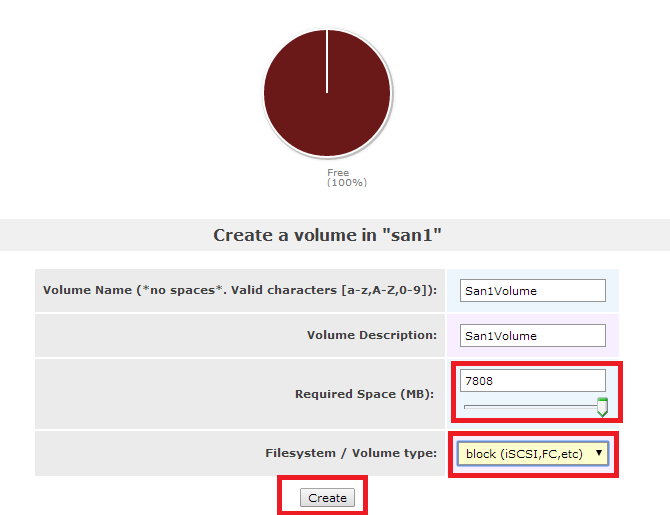
  • Create a new volume, select block(iSCSI, FC, etc) as File System, click on Create
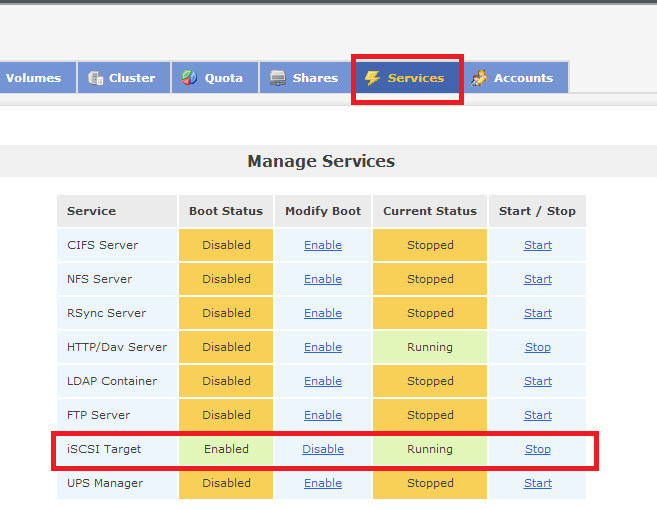
  • Click on Services tab and enable iSCSI target, start the service
  • Click on Volume Tab, then click on iSCSI targets link from the right side of the page
  • Accept the default target name and click on Add
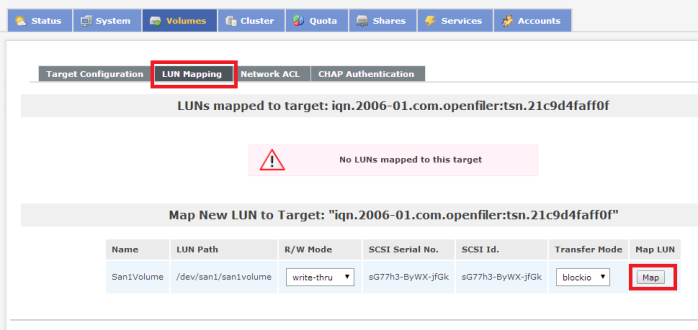
  • Click on LUN Mapping tab
  • From R/W Mode drop down select write-thru and click on Map button

Configure iSCSI target in ESXI

  • Select the ESXI server from you vSphere client
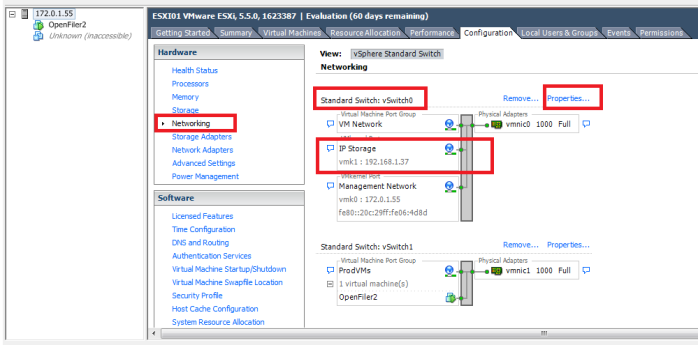
  • From the configuration tab goto Networking
  • Click Properties on vSwitch0
  • Click on Add
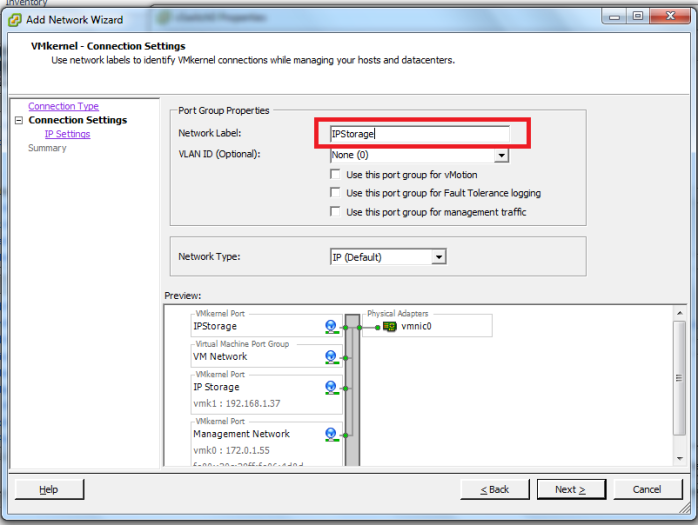
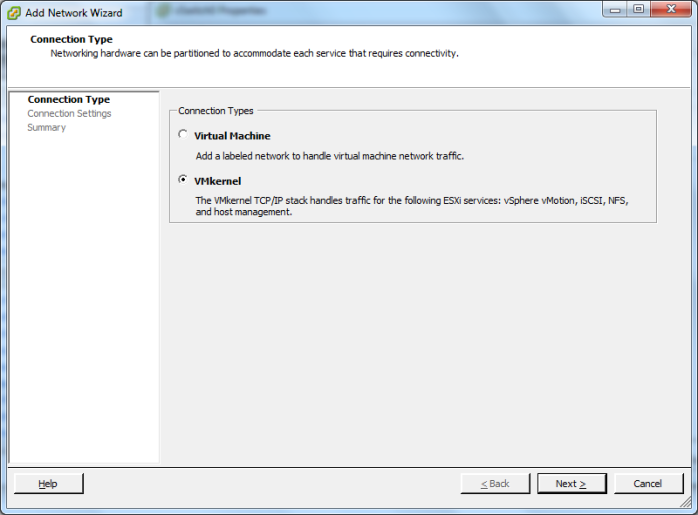
  • Select VMKernel as connection type
  • Assign a name – like IP Storage
  • Uncheck all check boxes and click next
  • Assign an IP or use DHCP
  • Click next and finish
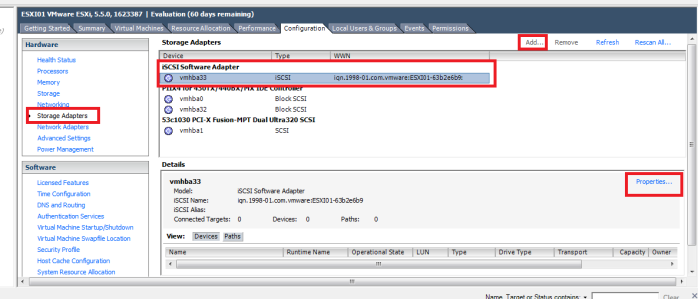
  • Go to storage adapter link and click on Add
  • Select iSCSI and click ok
  • Select the iSCSI software adapter device and click on Properties
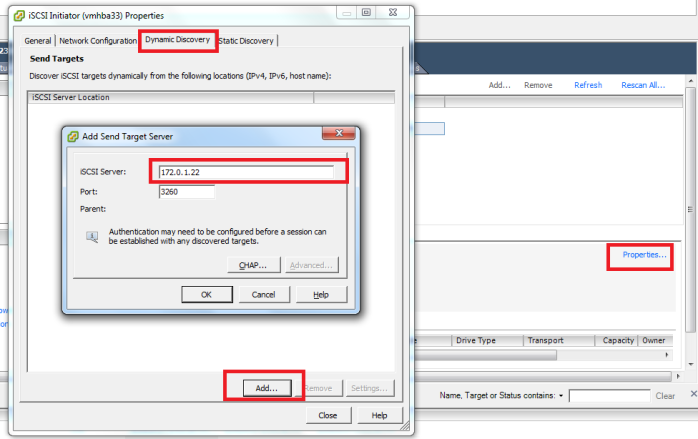
  • In the iSCSI initiator properties click on Dynamic discovery tab and click Add
  • Enter the IP address of your openfiler server as iSCSI server and click OK
  • Click Close
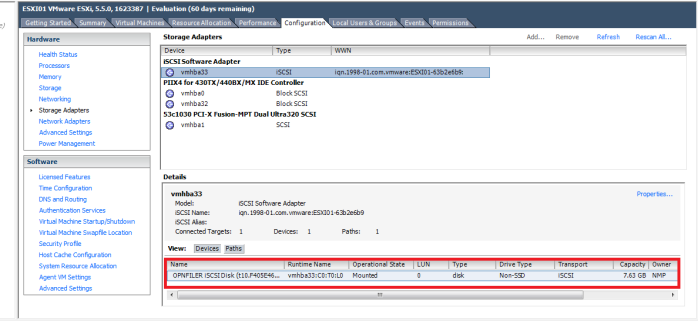
  • In the Rescan alert message, click Yes. After few seconds you will see that openfiler disk has been mounted
  • Click on Storage
  • Click on add storage link
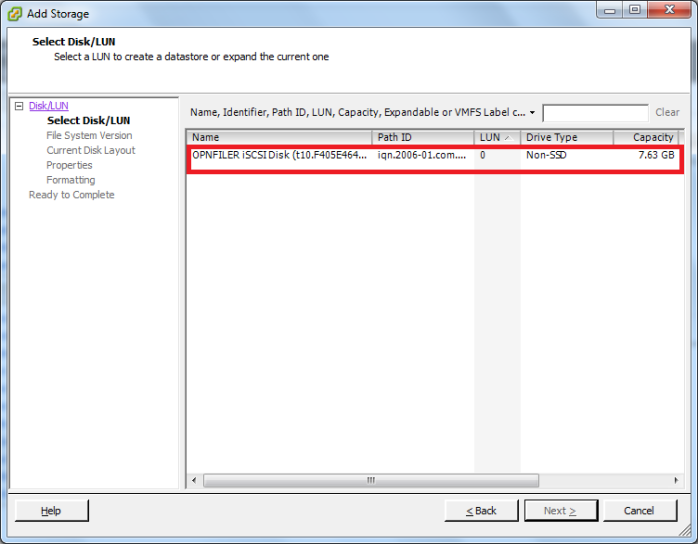
  • Select Disk/LUN as storage type
  • Select the storage that you have mounted earlier
  • In the file system version window select VMFS-5
  • Click next
  • Assign a name of this datastore
  • Select Maximum capacity and click next
  • Click Finish

Your Openfiler storage is ready to use!!

What is your plan to gather cloud knowledge in 2014?

Cloud computing is the ultimate of future IT. The major players in IT industry are heavily investing in this domain. What I believe is, if you don’t have knowledge on cloud computing, I doubt whether you will be able to survive in IT profession after the next 4/5 years or not. I always try to learn something new and after reaching Sydney, every morning I am asking myself – what should be my future action plan to secure my existence in IT industry. And what I found so far is having expertise in Cloud computing.
Few certifications which will help you to join this race are:

CompTIA Cloud Essentials certification

This is a very basic cloud certification to have a vendor neutral knowledge on cloud computing. I think this will be a recommended certification for every organization having corporate IT setup in future.  http://certification.comptia.org/getCertified/certifications/cloud.aspx

Amazon AWS Certification

Amazon is the number one cloud service provider in the market. For your immediate start in cloud computing profession this is the coolest certification in highest demand. http://aws.amazon.com/certification/

CloudU Certification

This is another vendor neutral certification from Rackspace who are in third position in cloud computing business.  http://www.rackspace.com/knowledge_center/cloudu/

Google Apps Certification

Do you want to start your own business? Are you dreaming to join in Google IT support team? Google Apps Certification could be the choice to fulfill your dream. http://certification.googleapps.com/

Microsoft Private Cloud + Windows Azure

For the Microsoft lovers it is the right time to upgrade your skill with Microsoft Private Cloud and windows Azure certification.  http://www.microsoft.com/learning/en-au/exam-70-487.aspx

http://www.microsoft.com/learning/en-us/private-cloud-certification.aspx

VMware Certification

This is one of the hottest certifications in the market. http://mylearn.vmware.com/portals/certification/

Citrix Certification

Citrix certification is always in demand. To take your career to the next level it will be a sure success.  http://training.citrix.com/cms/education/certification

I have started with CompTIA, what about you?

PowerShell Script – How to check folder/subfolder permission of your network drive

To check file level permission you can execute the below command
Get-ChildItem “G:\MyFolder” -recurse | Get-Acl | export-csv D:\File_permission.csv

To check only folder level permission you can execute the below command
Get-ChildItem “G:\MyFolder” -recurse | Get-Acl -Exclude *.* | export-csv D:\Folder_permission.csv